PhishSim Template Editor
Introduction
This article is focused on the WYSIWYG editor available when creating PhishSim templates. For more information about attack types and other aspects of PhishSim email templates, please see PhishSim Email Templates.
Note: If an Email Template is created from external source code, Infosec IQ will automatically sanitize any links that may be included in the source code and redirect them back to a PhishSim landing page. This ensures that emails cannot direct learners to a malicious URL.
Editing the Body of the Template using the Editor
Understanding the different parts of the editor

- Template Workspace: This area is the template workspace. Admins can drag and drop different elements into this space to start building their template
- Addings Columns: An admin can add columns to their template by dragging this tile into the workspace. Once added, click on the column element, this will bring up the column editor pane on the right-hand side. From there, an admin can define the number, style, and layout of the columns
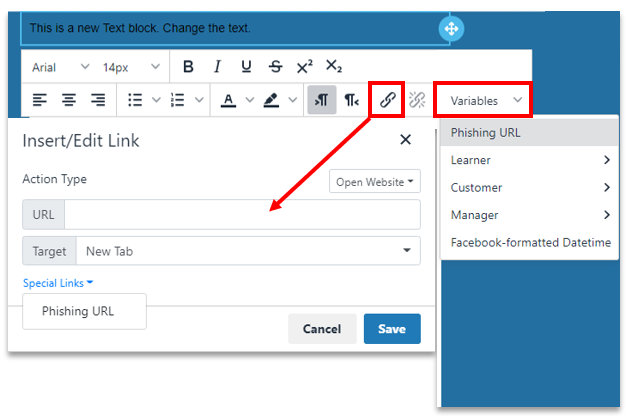
- Adding a Button: An admin can add a button to their template by dragging the button tile into the workspace. Once added, click on the button element, this will bring up the button editor pane on the right-hand side. From there, an admin can identify the URL, style, and format of the button. If the desired link is the phished URL, select the special links dropdown and select “phishing url”.
- Adding a Divider: An admin can add a divider to their template by dragging the divider tile into the workspace. Once added, an admin can customize the divider by click on it. This will open up the divider editor pane where an admin can select the color, size, and style of the divider
- Adding HTML: An Admin can add their own HTML, by dragging the HTML tile into the workspace area. Once added, the admin can click on the HTML area and that will open up the HTML editor on the right-hand side of the screen.
- Adding/Uploading an Image: An Admin can add an image to the template workspace by dragging the image tile over. Once added, an admin can upload or add an image URL by clicking on the image element to open up the image editor pane on the right-hand side. An admin will then be able to modify the image effects and add an action if a learner clicks on it.


Note: PhishSim templates support alternate text for accessibility. Any text entered in the Alternate Text field will be visible to a screen reader.
- Adding Text: An Admin can add a text block my dragging the text tile into the body of the workspace. Once added, they can add their desired text in the box. They also have the option to add hyperlinks and variables by using the text box toolbar.
Note: If you would like the desired text to be a phising indicator, you must add the phishing indicator tile first. See next step for how to add.
- Adding a Phishing Indicator: Phishing Indicators are one of the education options that an Admin can direct a phished learner too. When a learner gets phished, a new window will open up with a screenshot of the email they just clicked on. The indicators will show up as pop-ups to specifically point out what the learner should have noticed before clicking on the link. To add a phishing inidicator to the body of the message, an Admin must drag the phishing indicator tile to the desired location. Once added, the Admin can add the desired text and/or hyperlink to the edit pane on the right-hand side.


Note: Phishing Indicators can only be applied at the text box level. In order for the phishing indicators to be displayed when a learner gets phished, Interactive Phising Indicators must be selected as the education in Template Information.
-
Content: When this option is selected, it allows the Admin to modify or add content to the body of the email template
-
Blocks: When this option is selected, it allows the Admin to add blocks for different content.
-
Body: When this option is selected, it allows the Admin to modify to overall style of the template body.